
Sleeklens Light Rays Overlay Review
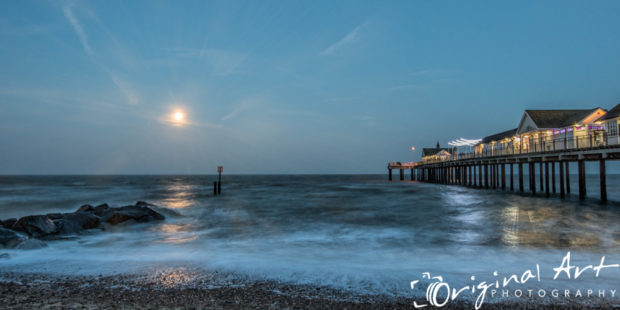
I was recently approached by Sleeklens to review one of their products. They provide Lightroom presets, Photoshop actions and Photoshop overlays for photographers to help them process their images. This review is of their Light Rays Overlay Bundle. The idea behind these overlays is that you can enhance an image by adding light rays emanating, for example, from the sun in a landscape photo. Small apertures can enable you to create a star effect from light sources and atmospheric conditions can allow for the presence of light rays (such as crepuscular rays at sunset coming through the clouds). The overlays are designed to be used either to create this effect or to enhance what is already present in the image. Below is an example of an image before adding the overlay, followed by the same image with a light rays overlay blended in.


You will notice that I have chosen to use the effect quite subtly. Personally, I find that retouching tends to produce better results if you are adding subtle extras rather than something that will take over. You could, of course, choose to make the effect more noticeable:

In my opinion using them at this strength doesn’t enhance a landscape photo. It may suit more graphic design or some dramatic composites, but this would be too strong for most applications. A more subtle use is much better for producing a scene that is still believable.
You receive the set of light rays overlays in jpg format. There is a good variety of designs including directional as well as central radiating patterns. A few colour versions are supplied but the majority are white on black overlays. This gives you the most flexibility to incorporate them into your image your own way. There are versions with broader or thinner light rays to suit your tastes. Ideally they could provide some with a more minimal amount of rays as they are all quite intense. However, you can adjust them yourself using a layer mask later. The instructions for use on the website are clear and helpful (how to use lighting Photoshop overlays). I would suggest that they add a pdf version of this to the download so that you can access them when not online and also so that you don’t have to go looking for the instructions.
Here is another example of an enhancement using a Sleeklens overlay:

Above is the original image with the light rays overlay added in the image below. I needed to apply a layer mask to block the effect from the foreground trees to make it look more believable. This is quick and easy to do if you are familiar with painting on layer masks.

For complete novices there are a few things you will need to learn. These overlays need you to understand how to use the transform tool, blending modes, adjustment layers, clipped adjustments and layer masks to get the most out of them. So, it seems to be aimed more at the intermediate Photoshop user. However, if you follow the instructions given and play around a bit then it shouldn’t take too long to get the hang of it. It is worth spending the time blending things in carefully with a layer mask to make it look like the light rays are part of the original scene rather than added on later. To do this, colourise the overlay using a clipped hue/saturation layer to match the light source. Group those layers together and bring down the opacity until it looks natural. Then finish off by masking out unwanted areas.

In this example I have used one of the directional overlays as the sun itself was not in the scene. I liked using it when some light rays were already present as a means to enhance them and add more drama to the picture. If you are a keen landscape photographer this is a useful tool to add to your retouching workflow.

I also tried adding light rays to a scene that didn’t already contain them:

I kept this extremely faint as it just looked odd to me otherwise. You have to be a little careful when adding them to a scene that had no light rays as it risks making the image look unrealistic. So, I think I will stick to adding them to landscapes as an enhancement to light rays that are already there. Although I’ve not yet had the chance to do so, I can see them having applications in more graphic/composite images as well where realism may not be such a concern.

Verdict
The light rays overlays are quick and easy to use if you are already proficient with the basics of Photoshop. For beginners they may take a bit of getting used to, but in the process you will learn a lot of key retouching skills. The overlays work best (in my experience so far) when there is already a hint of light rays present in the image. So, if you like to include them in your sunrise/sunset photos already then these will be a benefit to you to enhance the effect. There is a good range of options to choose from, although some less dense overlay patterns would make them even more useful without the need for slightly fiddly masking. You could, of course, create light enhancements from scratch yourself, but this can be time consuming and a bit hit and miss if you aren’t sure what you are doing. These overlays help to save time. You can polish your final image more quickly and try a range of overlays to find the best one with just a few clicks.
If you would like to try these light rays overlays for yourself you can find them at sleeklens.com and get 10% off with the code: enjoy10
© Joe Lenton, August 2016
Fantastic photos and very informative
– thank you Robert
http://www.lightden.co.uk
Thanks Robert, glad you found it useful